Monday, January 31, 2011

Nutella Butterscotch Cookies

I'm not a huge Nutella person, I mean I like it and everything but i'm not about to put it on my toast or eat it out of the jar. This was my 2nd time baking with it though and I thought it turned out pretty well. And I really liked it paired with the butterscotch. The dough for these cookies is really light and fluffy, like chocolate mousse.The cookies come out crispy on the outside and soft in the center.
*Linked to Sweets for A Saturday and Sweet Tooth Friday

Nutella Butterscotch Cookies

slightly adapted from Culinary Concoctions By Peabody


Ingredients:
½ cup unsalted butter, at room temperature
½ cup granulated sugar
½ cup firmly packed light brown sugar
½ cup Nutella or other hazelnut chocolate spread
1 egg
½ tsp. vanilla
1 ½ cups flour
1 tsp. baking soda
¼ tsp. salt
1/2 cup butterscotch chips

Directions:

Preheat oven to 350 deg F. Cream butter and sugars in a mixer on high speed, until light and fluffy. Add the egg and vanilla, then add the Nutella and mix well.
Add the flour, baking soda, and salt and mix on low speed until all the ingredients are incorporated. Increase the speed to medium and mix just until the dough is smooth. Fold in butterscotch chips.
Drop dough by teaspoonfuls onto greased cookie sheet. Bake 6-7 minutes. Let cool about 5 minutes and transfer to a rack to cool completely Follow TawnyAlexander on Twitter

Friday, January 28, 2011

Bittersweet Cocoa Souffles with Orange Blossom Cream

Yesterday was National Chocolate Cake Day. Did you know that? I celebrated today though, with these souffles. Ohh myy.. I love souffles. I love chocolate. Can you tell? I'm sorry, I hope you're not tired of all the chocolate. This was another one of the recipes featured in this month's bon appetit that I couldn't wait long to make. I really wish I had orange-flower water for the cream, but sadly I didn't. And I wasn't about to buy it, needing only a small amount. The orange flavored cream paired nicely with the souffles though and made them taste like that chocolate orange candy, you know the kind you whack on the counter and it seperates the wedges? But if you're not into those then I would suggest leaving the orange peel out of the cream.

Bittersweet Cocoa Souffles with Orange Blossom Cream
bon appetit magazine

I put the cream on right after I took these out of the oven..I couldn't wait. Hence the melted "mess."

Ingredients:
1/2 cup plus 3 TBLS. sugar
2 TBLS. all purpose flour
2/3 cup plus 2 TBLS. whole milk
1/2 cup natural unsweetened cocoa powder
2 large egg yolks
1 t. vanilla extract
4 large egg whites
1/8 t. cream of tartar
3 oz. bittersweet chocolate (do not exceed 61% cocao), finely chopped
Orange Blossom Cream (see recipe below)

Directions:
Butter 8 2/3-3/4 cup ramekins or custard cups; dust with sugar, completely coating up to top edge. Whisk 1/2 cup sugar, flour, and 1/8 t. (scant) salt in small saucepan. Pour 2/3 cup milk into measuring cup; whisk enough milk from cup into saucepan to form thick paste (2-3 TBLS.), then gradually whisk in remaining milk from cup. Stir over medium-low heat until bubbles begin to form around edges of pan. Continue cooking until slightly thickened, stirring constantly, about 2 minutes longer. Transfer mixture to large bowl. Add cocoa powder, remaining 2 TBLS. milk, egg yolks, and vanilla; stir until smooth, thick paste forms.
Using electric mixer, beat egg whites and cream of tartar in medium bowl until soft peaks form. Gradually beat in remaining 3 TBLS. sugar, beating on high speed until firm peaks form. Add 1/4 of whites to chocolate mixture, fold to blend. Add remaining egg whites and chopped chocolate and fold until whites and just blended into batter.
Divide batter among prepared ramekins; place on baking sheet. Bake at 375 deg F until souffles are puffed above rim of ramekin and toothpick inserted into center comes out with thick batter attached, about 12 minutes (15 if chilled). Using spoon, form small indentation in top of each souffle; spoon dollop of orange blossom cream into indentations. Serve immediately.
*Batter can be made 1 day ahead. Cover and chill.
Orange Blossom Cream
Ingredients:
1 cup chilled heavy whipping cream
1 1/2 TBLS. sugar
1 t. finely grated orange peel
3/4 t. orange-flower water
Directions:
Using electric mixer, beat all ingredients in medium bowl until peaks form.
*Can be made 6 hrs. ahead. Cover and refrigerate. Rewhisk before serving.
Follow TawnyAlexander on Twitter

Thursday, January 27, 2011

Chocolate Banana Cream Pie

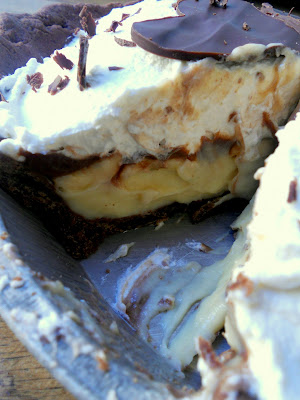
Matt's favorite kind of pie is banana cream. I'm not a big banana person..but I got so excited when I saw this, especially since I needed something to take to a potluck. Banana cream meets chocolate cream..best of both worlds! This pie is exactely how I thought it would turn out. It was so good! Like a chocolate covered banana. First there's a layer of the cream, then bananas, then chocolate cream and topped with whipped cream. I wish you could see the layers better. They say the first slice is the worst though, but since I was taking this somewhere..I couldn't really cut out any more slices. Who takes a pie somewhere with some if it missing? I do. With all my hard work you bet im gonna make sure and try it!
The pie itself was easy, but the crust took some time. I've never made a pie crust before (aside from a graham cracker one.- and hence the shabbiness of it). It was a little time consuming, but I made it the night before so it didn't seem like such a labor of love doing everything at once. I actually enjoyed the process of making the crust, I thought it was kinda fun. However I might get lazy next time and just try a frozen one.

Chocolate Banana Cream Pie
Makes 1 9 inch pie
Ingredients:
For Pie Crust:
1 cup plain all purpose flour
4 oz (1 stick) unsalted butter, chilled
1/4 cup water
1/4 teaspoon salt
1/4 cup cocoa powder
1/4 cup sugar

For Filling:
3/4 cups sugar
1/3 cup all-purpose flour
1/4 teaspoon salt
2 cups whole milk
3 egg yolks
1 tablespoon unsalted butter
1 teaspoon vanilla extract
1/4 cup semi-sweet chocolate chips

2 medium bananas, sliced
1 cup heavy cream3 tablespoons sugar1/2 teaspoon vanilla
Chocolate curls/shavings for garnish (optional)

Directions:
Prepare pie crust according to the technique outlined here adding in cocoa powder and sugar. Roll out and gently press into a 9" pie pan. Place pan and crust in the freezer for at least 10 minutes prior to baking (or while your oven is preheating).

Line crust with foil or parchment paper and fill full with pie weights or dried beans. Bake at 350 degrees for 20 minutes. Remove from oven and carefully remove weights and lining. Bake an additional 10-15 minutes until set. Allow to cool completely.

In a medium saucepan, mix sugar, flour and salt. Stir in 1 cup of milk, mix until smooth, and bring to a boil over medium heat, stirring constantly. Continue to stir until smooth and thickened, about 2 minutes, then remove from heat.

Beat the egg yolks with the remaining cup of milk. Temper the egg mixture with a small amount of the slightly cooled milk mixture then blend this into the larger saucepan with the cooling milk mixture.

Return saucepan to the heat and bring to a boil again, stirring constantly, lower heat and simmer until mixture is the consistency of thick pudding, about 1 minute.

Remove from the heat and quickly stir in butter and vanilla. Transfer half of the filling mixture to a small bowl and set aside. Add chocolate chips to remaining filling and stir until melted and smooth.

Allow fillings to cool for 5 minutes, then pour plain filling into cooled pie shell. Arrange a single layer of banana slices on top of the filling. Pour chocolate filling on top. Refrigerate until completely cooled.

Whip cream until almost stiff. Add sugar and vanilla; beat until cream holds peaks. Gently spread whipped cream on top of cooled filling, smoothing top into a slight dome. Garnish with chocolate shavings or curls if desired.
*Linked up to Sweets For A Saturday
Follow TawnyAlexander on Twitter

Wednesday, January 26, 2011

Cocoa Brownies with Browned Butter and Walnuts

This is another recipe from this month's bon appetit that I couldn't wait to try. In fact, the picture for these was the cover. And you can bet I was excited when it slipped through the mail slot and I saw these. So of course, I made them nutless as previously explained. However they were fantastic either way. All the things a good brownie should be- fudgey inside, chewy and they had a (slight) crackly top. Although I thought these were great, I wouldn't call them my favorite. But then again, that would be a very hard thing for me to do with any brownie recipe. Just a reminder: don't make these if you're out of milk. You'll be kicking yourself if you do. Oh hey, know what I just noticed? These are almost identical to Best Cocoa Brownies that I posted a while back ago, haha. Guess I shoud have checked that earlier. I was thinking they felt familiar and didn't decide to check until after these ones were done. Either way i'm sure I would have made them!

Cocoa Brownies with Browned Butter and Walnuts
bon appetit magazine


Ingredients:
10 TBLS. (1 1/4 sticks) unsalted butter, cut into 1 inch pieces
1 1/4 c. sugar
3/4 c. natural unsweetened cocoa powder
1 t. vanilla extract
2 large eggs, chilled
1/3 c. plus 1 TBLS. unbleached all purpose flour
1 c. walnuts

Directions:
Preheat oven to 325 deg F. Line 8x8 inch pan with foil leaving 2 inch overhang. Coat foil with nonstick cooking spray.
Melt buter in medium saucepan over medium heat. Continue cooking until butter stops foaming and browned bits form at bottom of pan, stirring often, about 5 minutes. Remove from heat; immediately add sugar, cocoa, 2 t. water, vanilla, and 1/4 t (generous) salt. Stir to blend. Let cool 5 minutes (mixture will still be hot).
Add eggs to hot mixture 1 at a time, beating vigorously to blend after each addition. When mixture looks thick and shiny, add flour and stir until blended. Beat vigorously 60 strokes. Stir in nuts. Transfer batter to prepared pan.
Bake brownies until toothpick inserted into center comes out almost clean (with a few moist crumbs attached), about 25 minutes. Cool in pan on rack. Using foil overhang, lift brownies from pan and cut.
*Can be made 2 days ahead. Store airtight at room temp.
*Linked up to Sweets For A Saturday
Follow TawnyAlexander on Twitter

Tuesday, January 25, 2011

Crisp Cocoa-Pecan Cookies

I received my bon appetit magazine in the mail yesterday and there were a few recipes that caught my eye right away and knew I had to make soon! I decided to start first with this one because I had all the ingredients on hand and well, they're cookies, I can't help but get excited. I only made 1/2 batch like I usually do with first time recipes and now i'm wishing I hadn't! I left out the nuts since my husband doesn't like nuts in his baked goods (unfortunately. Especially since they would have been so good in these), but they still had a slight nutty, or butterscotch flavor to them. They really did spread out more than I thought they would and you'll end up with a thin, crispy cookie. They felt slightly fancy to me, don't ask why. I really did love these and i'm already thinking of when I can make them again.
Crisp Cocoa-Pecan Cookies
bon appetit magazine
Yield: about 16 oversize cookies
Ingredients:
1 1/3 cups all-purpose flour
3 TBLS. natural unsweetened cocoa powder (scooped into measuring spoon, then leveled)
1/2 t. baking soda
10 TBLS. (1 1/4 sticks) unsalted butter, melted, cooled
1/3 c. (packed) golden brown sugar
1/3 c. sugar
2 TBLS. plus 2 t. light corn syrup
2 TBLS. whole milk
1 t. vanilla extract
1 cup chopped pecans or walnuts
1/2 c. bittersweet chocolate chips
Directions:
Whisk flour, cocoa, baking soda, and 1/2 t. (generous) salt in medium bowl. Stir butter and next 5 ingredients in another medium bowl until smooth. Stir in flour mixture, then nuts. Cover and chill until firm enough to scoop, atleast 4 hours. (Mine felt firm sooner so I only chilled for about 2 hours). *Can be made 1 day ahead; Keep chilled.
Preheat oven to 325 deg F. Line baking sheet with parchment paper. Measure 2 level tablespoonfuls dough; roll between palms into ball. Place on prepared baking sheet. Using fingers, spread out dough to 3 inch diameter disk. Repeat with remaining dough, spacing 5 inches apart.
Bake cookies 8 minutes; reverse sheets. Bake cookies until flat and beginning to darken around edges, about 10 minutes. Transfer cookies on parchment to cooling rack. *Can be made 4 days ahead. Store airtight at room temperature.
Melt chocolate chips. Drizzle over cooled cookies and let stand until chocolate sets, about 30 minutes.
Linked up to
Follow TawnyAlexander on Twitter

Friday, January 21, 2011

Top Chef Eric's Chocolate Chip Cookies

I don't watch Top Chef. I once had tickets to go see something they were doing but of course I accidentally deleted it from my email and wasn't able to get new ones. (It's ok, they were free, wasn't that big of a deal). So I don't know much about the show, but I do know they did some "Just Dessert" episodes and this recipe was on one of them. It came from Eric Wolitzky who is a pastry chef at Baked (a bakery and cafe in Brooklyn, NY). These cookies were bakery style. Big, soft, chewy and chocked full of chocolate. I loved the use of coarse kosher salt in these. You could really tell how it complimented the sweet without being overly salty. I noticed there wasn't any vanilla used in this recipe. Next time i'll try adding a little and see how it compares, even though I thought these were delicious as they are. I think I may have baked mine a minute or two too long because they weren't as soft after cooling, but after a few seconds in the microwave and they were good as fresh. I don't know why they put the ingredients in grams and ounces, probably to confuse us. But go ahead and pull out your scale if you have one, otherwise i'll just note the conversions I used.
PS-check out Lisa's Blog Sweet As Sugar where you'll find this and many other delicious looking sweets for sweets for Saturday.
Chocolate Chip Cookies
Eric Wolitzky from Top Chef
I made a half batch and got 20 cookies out of it. Of course it will depend on how large you make them. I made the scoops about twice the size as I would regularly. The dough was pretty dry, so dropping, like I would normally do, wasn't really an option, I had to squeeze into balls (don't flatten).
Ingredients:
340 grams butter (1 1/2 c.)
200 grams sugar (1 c.)
400 grams brown sugar (2 c. tightly packed)
21 ounces flour (4 2/3 c.)
1 tablespoon baking soda
1 tablespoon salt (coarse, Kosher-less if you're usin regular table salt)
2 eggs
2 yolks
21 ounces chocolate chips (I used chunks)
Directions:
1. Melt butter, cool slightly.
2. Paddle sugars with melted butter.
3. Whisk together dry ingredients.
4. Add eggs slowly.
5. Add flour, mix, add chips.
6. Bake at 325 for 14min or until golden brown.
Follow TawnyAlexander on Twitter

Monday, January 17, 2011

PW Cinnamon Rolls

A couple months ago my friend sent me this link for Pioneer Woman's chocolate chip cookie sweet rolls. She hadn't tried them but knows I like chocolate chip cookies and thought I should make them. Well..I did.. and sadly they were not good. They looked great but definitely not something I would make again or give to someone. Or even care to consume myself.
First of all I was upset about the fact that the yield for the recipe says 24 rolls so I was debating if i I wanted to do a half batch or full and decided to do the full batch since I was going through all the effort anyway. THEN proceeding through the recipe it says cut the dough in half and use the other half for something else or make a double batch. What?? (The recipe for the dough for the chocolate chip cookie rolls and the cinnamon rolls are the same, but just worded differently in the directions for the posts). The yield should not say 24 if it's really double that. I'm glad I decided to wait to see how the chocolate chip rolls turned out before using the other half of the dough because I ended up tossing them all! (Except the one I tried.) And also, I followed the directions and amount exactely for the icing and that was another failure. There was way too much liquid, it was like water, even after adding a bunch of extra powdered sugar, then just decided not to waste anymore ingredients on it.
At that point I was glad I had another batch of dough in the fridge even though I had to go through the process again of making more rolls. I made her cinnamon rolls but decided not to make her maple icing to go with it. First of all I didn't have maple flavoring and didn't want to buy it just for this. And second I don't care much for maple icing, I prefer regular good ol' cream cheese frosting on cinnamon rolls. The cinnamon rolls turned out great, it was just a long, frustrating process to get to them! Usually I wait until the rolls have cooled and then frost them but this time I did it while they were still warm so it was more like a glaze. I think I like the thick frosting better, but both are good!

Pioneer Woman's Cinnamon Rolls with Maple Frosting (Go here for the cream cheese frosting that I used)


Ingredients:
1 quart Whole Milk
1 cup Vegetable Oil
1 cup Sugar
2 packages Active Dry Yeast
8 cups (Plus 1 Cup Extra, Separated) All-purpose Flour
1 teaspoon (heaping) Baking Powder
1 teaspoon (scant) Baking Soda
1 Tablespoon (heaping) Salt
Plenty Of Melted Butter
2 cups Sugar
Generous Sprinkling Of Cinnamon

MAPLE FROSTING:
1 bag Powdered Sugar
2 teaspoons Maple Flavoring
½ cups Milk
¼ cups Melted Butter
¼ cups Brewed Coffee
⅛ teaspoons Salt

Directions:
Mix the milk, vegetable oil and sugar in a pan. Scald the mixture (heat until just before the boiling point). Turn off heat and leave to cool 45 minutes to 1 hour. When the mixture is lukewarm to warm, but NOT hot, sprinkle in both packages of Active Dry Yeast. Let this sit for a minute. Then add 8 cups of all-purpose flour. Stir mixture together. Cover and let rise for at least an hour.
After rising for at least an hour, add 1 more cup of flour, the baking powder, baking soda and salt. Stir mixture together. (At this point, you could cover the dough and put it in the fridge until you need it – overnight or even a day or two, if necessary. Just keep your eye on it and if it starts to overflow out of the pan, just punch it down).
When ready to prepare rolls: Sprinkle rolling surface generously with flour. Take half the dough and form a rough rectangle. Then roll the dough thin, maintaining a general rectangular shape. Drizzle 1/2 to 1 cup melted butter over the dough. Now sprinkle 1 cup of sugar over the butter followed by a generous sprinkling of cinnamon.
Now, starting at the opposite end, begin rolling the dough in a neat line toward you. Keep the roll relatively tight as you go. Next, pinch the seam of the roll to seal it.
Spread 1 tablespoon of melted butter in a seven inch round foil cake or pie pan. Then begin cutting the rolls approximately ¾ to 1 inch thick and laying them in the buttered pans.
Repeat this process with the other half of the dough. Let the rolls rise for 20 to 30 minutes, then bake at 375 degrees until light golden brown, about 15 to 18 minutes.
For the frosting, mix together all ingredients listed and stir well until smooth. It should be thick but pourable. Taste and adjust as needed. Generously drizzle over the warm rolls.
Follow TawnyAlexander on Twitter

Friday, January 14, 2011

Chocolate Cupcakes with White Chocolate Sour Cream Frosting

I was looking through my cupboard and spotted my boxes of Guittard chocolate wafers. I noticed on the back there was this recipe and it sounded so good! I especially liked that the yield was 12 so by making half batch I would end up with only 6 cupcakes which is great for just the 2 of us. These are not your typical light, fluffy, super moist cupcakes. Instead they are very dense so it doesn't take quite as many to satisfy. The frosting too wasn't your typical light, fluffy frosting. It was more of a white chocolate layer on top of the cupcake. I've noticed a lot of these Guittard recipes i've tried are very similar. This one in particular reminded me of the Milk Chocolate Decadence Cake I posted here.
Chocolate Cupcakes with White Chocolate Sour Cream Frosting
Guittard


Chocolate Cupcakes
Ingredients:
1 1/3 cups (8 oz.) Guittard 72% Cocoa Bittersweet Chocolate Wafers (or any good quality bittersweet chocolate, chopped)
1/2 cup butter
1 cup sugar
4 large eggs
1 t. vanilla extract
3/4 cup unbleached all-purpose flour

Directions:
Preheat oven to 350 deg F. Line 12 cupcake forms with paper liners.
Melt wafers and butter in top of double boiler over low heat, stirring constantly until melted and smooth. Transfer to a large bowl and beat in sugar, then eggs and vanilla until glossy. Stir in flour just until incorporated.
Fill cupcake liners 3/4 full. Bake 25-30 minutes or until tops are rounded and puffy. A toothpick inserted in center will still have crumbs clinging to it. Cool completely before frosting.

White Chocolate Sour Cream Frosting (makes just enough for above recipe)
Ingredients:
1 cup (6 oz.) Guittard 31% Cacao White Chocolate Wafers (or any good quality white chocolate, chopped)
1/4 cup sour cream
1/4 t. vanilla extract

Directions:
Melt white chocolate and sour cream in top of double broiler over low heat stirring constantly until smooth. Stir in vanilla. Transfer to large mixing bowl and chill for 2 hours or overnight. Whip for about 1-2 minutes at high speed, stopping to scrape bottom and sides of bowl, until frosting lightens in color and a good spreading constistency is achieved. Refrigerate until ready to use. Frosting can be prepared in advance. Follow TawnyAlexander on Twitter

Wednesday, January 12, 2011

Baked Penne with Roasted Vegetables

Here's another recipe i've had for a while I thought i'd share since I haven't yet. It's very versatile, you can put in whatever vegetables and cheese you want (although fontina is really good!). I didn't have mozzarella or parmesan when I made it this time so I used something else. I never put the mushrooms or peas since I don't like either of those. Be sure to use a good marinara sauce though, it makes all the difference.

Baked Penne with Roasted Vegetables

Ingredients:
2 red peppers, cored and cut into 1-inch wide strips
2 zucchini, quartered lengthwise and cut into 1-inch cubes
2 summer squash, quartered lengthwise and cut into 1-inch cubes
4 cremini mushrooms, halved
1 yellow onion, peeled and sliced into 1-inch strips
1/4 cup extra-virgin olive oil
1 teaspoon salt, divided
1 teaspoon freshly ground black pepper, divided
1 tablespoon dried Italian herb mix or herbs de Provence
1 pound penne pasta
3 cups marinara sauce (store bought or homemade)
1 cup grated fontina cheese
1/2 cup grated smoked mozzarella
1 1/2 cups frozen peas, thawed
1/4 cup grated Parmesan, plus 1/3 cup for topping
2 tablespoons butter, cut into small pieces

Directions:
Preheat the oven to 450 degrees F.
On a baking sheet, toss the peppers, zucchini, squash, mushrooms, and onions with olive oil, 1/2 teaspoon salt, 1/2 teaspoon pepper, and dried herbs. Roast until tender, about 15 minutes.

Meanwhile, bring a large pot of salted water to a boil over high heat. Add the pasta and cook for about 6 minutes. Since you will be cooking the pasta a second time in the oven, you want to make sure the inside is still hard. Drain.

In a large bowl, toss the drained pasta with the roasted vegetables, marinara sauce, cheeses, peas, 1/2 teaspoon salt, and 1/2 teaspoon pepper. Using a wooden spoon, gently mix, until all the pasta is coated with the sauce and the ingredients are combined.

Pour the pasta into a greased 9 by 13-inch pan. Top with the remaining 1/3 cup Parmesan and butter pieces. Bake until top is golden and cheese melts, about 25 minutes.

Follow TawnyAlexander on Twitter

Tuesday, January 11, 2011

Sicilan Chocolate Gelato

This recipe comes from the Scharffen Berger recipe collection. This is the first time making gelato and i'm pretty satisfied with the results. Especially since it's so pricey to buy for such a small cup. The gelato was very rich and creamy and simple to make and i'm excited to try other variations. There's also directions to make granita or fudge pops, however I haven't tried either of those.
Sicilan Chocolate Gelato


Makes one scant quart gelato or 6-12 fudge pops.
Ingredients:
3 cups whole milk
2/3 cup granulated sugar
3/4 cup Scharffen Berger Natural Cocoa Powder (unsweetened) (you could use any brand, but use a good one you like since the gelato will taste like the cocoa.)
1-1/2 tablespoons cornstarch

Equipment:
Ice cream maker or ice pop molds

Directions:
In medium saucepan bring 2 cups of the milk to a simmer. Meanwhile, whisk the remaining cup of milk with the sugar, cocoa, and cornstarch. Scrape the cocoa mixture into the hot milk. Cook, stirring constantly until the mixture thickens and bubbles a little at the edges. Stir and cook for a minute longer. Be sure to use a pot with quite a bit of room or else it might end up bubbling up and over the side.
Strain through a fine wire-mesh strainer into a clean bowl and cool. Cover the surface of the mixture with plastic wrap and chill overnight. (You may also set the bowl over an ice bath and stir the hot gelato mixture frequently until cool).

TO MAKE GELATO: Freeze according to the instructions with your ice cream maker. The mixture is thick to begin with and may take less time than average in the ice cream maker. Makes one scant quart ice cream.

TO MAKE FUDGE POPS: Divide the chilled gelato base between the ice pop molds and place in the freezer overnight to set. These will have a slightly icy texture. (If you have an ice cream maker and would like a finer-textured fudge pop, freeze the gelato base according to the instructions with your ice cream maker and divide the mixture evenly between ice pop molds. Place in the freezer overnight to set.)

TO MAKE GRANITA: Pour the chilled gelato base into a large, shallow baking dish (the shallower the dish, the faster the mixture will freeze) and place in the freezer. In about an hour, the liquid will begin to freeze along the sides of the pan. Using a fork, scrape the ice towards the center of the pan. Repeat this process every 20 minutes or so until all of the mixture is frozen and flaked.
Follow TawnyAlexander on Twitter

Sunday, January 9, 2011

Multi-Grain Bread (No Knead)

It's been a while. But i'm making my come back with a good one. First of all, I love bread. I love homemade bread and I love how it makes the house smell. There should be a candle that's homemade bread scented cuz I would buy it and have it lit at all times. I don't make bread too often, mainly because of the work involved, but we always enjoy it when I do. That's one reason why this recipe caught my attention. No Knead. And it's something different, it's multi grain. I mostly just make regular whole wheat bread but I really wanted to try something different. A couple of the ingredients involved are a little out of the ordinary, but relatively easy to find. Besides, I figured if this is something I like and will be making more of in the future, I don't mind getting the things needed since i'll actually be using them. And yes, I will be making more! The bread turned out just how I hoped it would! The crust was chewy and the center was so soft and so chewy and so perfect. The recipe seems a little long, but the hands on time is minimal since most of it is waiting. Even the waiting time isn't so bad since it's such a huge range (3-10 hrs, for example), that you can work it around your schedule. I saw this recipe on Our Best Bites, and like them, I started this bread Saturday evening then put it in the fridge. Before bed that night I took it out and put it on the counter, then Sunday afternoon-ish moved on to the next step. This recipe can also be made as a kit in a jar to give away.

Multi-Grain Bread
Fom the book kneadlessly simple by Nancy Baggett, via. Our Best Bites


Ingredients:
3 C (15oz) unbleached white bread flour
1/4 C (1.25 oz) whole wheat flour
1/4 C brown rice flour
2 T rolled quick oats (not instant)
2 1/2 T granulated sugar
1 1/2 tsp table salt
1 1/2 T each sesame seeds, poppy seeds, and flax seed, mixed together
2 T cornmeal
1 packet Fleischmann's Rapid Rise Yeast
1 liter mason jar if you're making the kit (ps-don't forget to include the recipe if you're giving this away!)

Directions for the kit (if you're not making the kit, just place ingredients into a bowl instead of the jar): Place the white flour in the jar using a funnel. Tap the jar on the counter to settle the flour. Set aside 1 1/2 T. of the seed mixture, and place the rest in a bowl along with the whole wheat flour, brown rice flour, oats, sugar and salt. Stir to combine then place in the jar. Tap again to settle all the ingredients so everything fits. Take the set aside 1 1/2 T. of seed mixture and place in a small bag with the cornmeal. Place the bag, along with the packet of yeast into the top of the jar. That's all there is to the kit. They keep in the pantry for up to 1 1/2 months or refrigerate up to 3 months. I contemplated making a couple jars just to keep around so next time everything will already be measured out for me.

Ingredients:
1 Multigrain Bread Mix
Scant 2 C ice water
1 1/2 T canola oil

Directions:
Set aside yeast and cornmeal-seed packets. Place the rest of the jar ingredients into a bowl. Measure out 1 t. of yeast and place it into the bowl then stir. Stir ice cubes into some water and wait atleast 30 sec. before measuring. Slowly pour water into dry ingredients. Go slowly, you may not need all the water. If you add too much, just mix in a little more flour. Add enough to bring the dry ingredients together, stirring vigorously and scraping the bowl sides. The dough shoud be stiff.
Once combined, brush the top with a little oil and tightly cover with plastic wrap. Refrigerate for 3-10 hours then let rise at room temperature for 12-18 hours.

After rising, generously oil a 9x5 inch loaf pan and sprinkle half of the cornmeal-seed mixture into the bottom and up sides of the pan. Stir the dough briefly, then pour into pan. Brush the top lightly with oil, then spread the dough into the pan using your fingers. Brush the top of the loaf generously with water then immediately sprinkle the remainder of the cornmeal-seed mixture on top. (I'm not sure if I reserved too much for the top or if I just didn't use enough water, but after making I had a lot of extra loose cornmeal mixture that I just ended up dumping off from the top). Using an oiled knife, cut a 1/2 inch deep slash down the center of the dough. Cover the pan with greased seran wrap.

2nd Rise:
For a 2-4 hour regular rise: let stand at warm room temp.
For a 45 min- 2 hour accelerated rise: let stand in a turned off microwave along with 1 C of boiling water. When the dough nears the plastic, remove it and continue the rise until the dough extends 1/2 inch above the rim of the pan.

After the 2nd rise, 15 minutes prior to baking, put a rack on the very lowest rack of your oven and place a broiler pan, or other shallow baking pan on it. Place your other rack one notch above that and preheat to 450 degrees.To bake, reduce heat to 425. Add one cup of water to the pan on the bottom rack; don't refill if it boils dry. Bake bread on the other rack for 35-45 minutes or until the loaf is nicely browned. Cover the top with foil and continue baking for 20-25 minutes until a skewer inserted in the thickest part comes out with just slightly moist particles clinging to the bottom portion. Follow TawnyAlexander on Twitter

Monday, January 3, 2011

What's Up?

I haven't posted anything here for a really long time, I know. So I thought i'd give an explanation. It first started slowing down after I got pregnant. Then on top of that, right before Thanksgiving I got my appendix out. That was a very long recovery full of dr. appts. and blood tests! Not long after we took a little trip to Monterey, went up to WA for Christmas and the day after returning home from that headed to Disneyland for New Years. And currently we're down by San Diego for a couple more days while my husband does some stuff for a book he's working on. Phew! So much has been going on the last couple months cooking and baking (and blogging) hasn't exactely been on the top of my to-do list and i've been letting a lot of other people and places take care of it for me. Maybe once we get back and things start to get back to normal it'll resume. In the meantime i'll just be enjoying the rest of this break :) Follow TawnyAlexander on Twitter